How to Remove Tile and Grout Like a Pro
Proper tile and grout removal is essential for a successful installation or repair and durability of your concrete floors. Follow these steps for easy tile and grout removal.
Key Takeaways:
- Removing tile and grout from a concrete floor isn’t complicated, but it will take some work
- A tile removal machine can streamline the job
- Scraping the mortar off the floor is another part of the job
- Grinding the floor down afterward will smooth it all out
Tiles add timeless beauty, durability, and functionality to any space. Their versatility, easy maintenance, and cost-effectiveness make them a popular choice for concrete floors in residential and commercial settings.
But there may come a time when you want to remove them. Maybe you’re renovating an old home, replacing damaged tiles, or exposing the concrete floor to apply a decorative finish. Whatever your reason, you’ll need to know how to remove tile and grout from concrete floors.
Removing tiles from a concrete floor is a multi-step process that can be tedious and time-consuming. Tiles mortared directly to the concrete floor can be challenging to remove. You must knock them out and scrape off the adhesive before exposing the polished concrete floor beneath.
Without proper knowledge and preparation, this project can turn into a big mess, and you might destroy the concrete floor. Here’s a step-by-step guide on removing tile and grout from concrete floors without causing any damage.
Safety equipment needed
Safety is paramount for a successful tile removal project. Dust and sharp tile shards can easily scratch or cut your skin if you’re not properly protected. Ensure you have the following:
- Safety goggles or glasses
- A dust mask
- Heavy-duty, thick-padded gloves
- Knee pads to avoid uncomfortable pressure and injuries on your knees
- Long pants, closed-toe shoes, and a long-sleeved shirt to keep your skin covered
With adequate safety gear, the tile removal process will be smooth, safe, and easy.
Surface preparation
Adequate surface preparation is essential for a hassle-free, efficient tile removal process. Clear the area of all furniture, wall hangings, rugs, and other objects that might be in the way. This will give you ample space to work and avoid accidental damage to other items.
Cover permanently fixed objects like cabinets, toilets, and appliances with a heavy-duty tarp or drop cloth to protect them from dust and debris. Turn off and cover indoor air circulation systems, including your AC units, HVAC systems, and ceiling fans, to prevent the spread of dust throughout the area. Open all doors and windows in the room to allow fresh air circulation and prevent dust buildup.
How to remove tile and grout: the process
There are several ways to remove tile and grout from concrete floors. The method you choose will depend on the tile type, how they are attached to the floor, and the size of the area you’re working on. Tiles fixed with adhesives are more challenging to remove than click-in or floating tiles. Using a chisel and hammer is the most common method in smaller areas, while tile removal machines are more efficient for large areas.
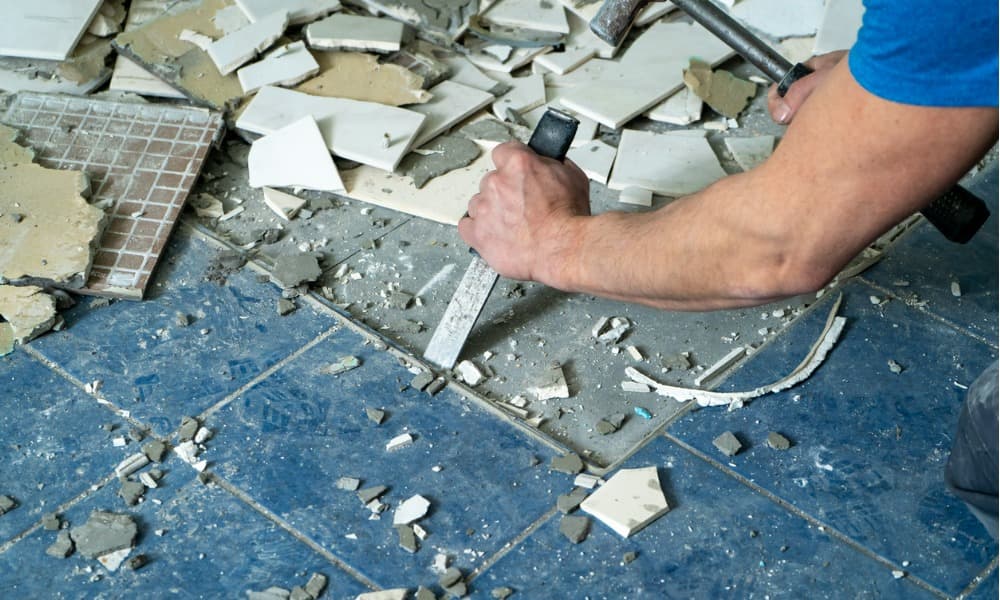
Chisel and hammer method
For this method, you’ll need a 2.5 cm wide masonry chisel and a hammer. Follow these steps:
- Start by breaking up the grout around the perimeter of each tile with the chisel. Hold the chisel perpendicular to the tile and tap it lightly with the hammer to loosen the grout.
- Insert the chisel at a 45-degree angle between the tile and concrete floor. Gently tap it with the hammer, forcing it down to break the bond or adhesive.
- Pry the tile up by levering the chisel under it. Work your way around the tile until it pops free. Remove any residual adhesive or mortar with the chisel to reveal the concrete floor beneath.
- Repeat these steps for each tile until all the tiles are removed.
For stubborn tiles, strike the chisel with more force to break it or use a flat-head screwdriver in lieu of the chisel to pry up the tile. Be careful not to damage the concrete floor when removing the tile. Move the tile shards to a trash can or dumpster for disposal.
Using a hammer drill
For tiles deeply lodged in the adhesive, you may need to use a hammer drill with a chisel bit attachment. The drill sends vibrations through the chisel, breaking the grout and tile free from the floor. Unlike the individualized chisel and hammer method, working with a hammer drill is quicker, more efficient, and less laborious.
- Create a starting point by breaking the grout around the perimeter of each tile with a chisel and hammer.
- Attach a chisel bit to the hammer drill and set it at a 45-degree angle.
- Position the chisel tip against the tile and squeeze the trigger to start the drill. Guide the drill around the tile and watch the magic unfold. Move to the next tile and repeat the process.
Since the hammer loosens up the thin-set mortar with the tiles, you won’t need to scrape it off the floor. All that will be left is clean concrete, ready for whatever new surface you choose.
Tile removal machines
For larger areas, a commercial-grade tile removal machine will make short work of the job. These specialized machines can remove hundreds of square feet of tile in just a few hours. They are available in propane and electric models and can be rented from most home improvement stores.
Propane-powered machines are ideal for large spaces, as they aren’t tethered to an electrical outlet. Their output and efficiency justify their high price tag, but they are hard to use.
Electric models are a cheaper alternative and still get the job done, though they require an outlet and extension cord. They’re lighter and easier to maneuver, making them a good choice for DIYers.
Ensure you choose the right blade for a smooth cut. A wide blade will remove more material, but a narrower blade will give you more control. Steel-hardened blades handle stubborn grout and adhesives better than default blades.
- Start by attaching the proper blade to the machine.
- Adjust the handles and wheels for comfortable operation.
- Power on your machine and guide it along the grout line. Move at a consistent pace to avoid damaging the concrete floor. The blade will work for you, effortlessly removing the tile and grout.
These are the three main methods of removing tile and grout. The chisel and hammer method is the most affordable but also the most labor-intensive. A hammer drill will make quick work of the job and is an excellent middle ground between the two methods. Tile removal machines are ideal for large areas but can be cost-prohibitive. You will need to scrape mortar off the floor and grind the concrete to smooth it out before adding protective treatments.
Hire an expert for the job
Hiring an expert is always the best option if you’re feeling overwhelmed or uncomfortable tackling the project. An experienced professional will have the tools and know-how to complete the job quickly and efficiently.
The concrete pros at Concreate pack a decade of experience in concrete resurfacing, repair, and removal. We’re your one-stop shop for your concrete needs – we do everything but pour it! Visit thisisconcrete.com or contact us today for a quote.